December 04, 2015

Galactic Warrior - overview for American Girl Doll


Because of copyright and legal reasons I had to rename my posts and descriptions but I hope you still know what I am referring to :-)

Galactic Warrior - Robe for American Girl Doll


You can buy my Galactic WarriorRobe pattern in my store which will give you an instantly downloadable PDF pattern.


The pattern complements my Galactic Warrior Outfit pattern (also going to be found in my store and on PixieFaire).


Also see my free Galactic Warrior tutorials


Out of copyright and legal reasons I had to rename my posts and descriptions but I hope you still know what I am referring to :-)

Galactic Warrior - Tunic for American Girl Doll


You can buy my complete Galactic Warrior Outfit pattern in my store which will give you an instantly downloadable PDF pattern. Click on the link or picture to go there.


The set includes sewing and assembly instructions for
  • Tunic 
  • Pants 
  • Sash
  • Belt 
  • Tabards
Compliment your Galactic Warrior with a Galactic Warrior Robe (can also be found in my store and on PixieFaire)

Also see my free Galactic Warrior tutorials


Out of copyright and legal reasons I had to rename my posts and descriptions but I hope you still know what I am referring to :-)

Galactic Warrior - Obi and Belt for American Girl Doll


You can buy my complete Galactic Warrior Outfit pattern on PixieFaire which will give you an instantly downloadable PDF pattern. Click on the link or picture to go there.


The set includes sewing and assembly instructions for
  • Tunic 
  • Pants 
  • Sash
  • Belt 
  • Tabards

See my other free Galactic Warrior tutorials


Out of copyright and legal reasons I had to rename my posts and descriptions but I hope you still know what I am referring to :-)

Galactic Warrior - Pants for American Girl Doll


You can buy my complete Galactic Warrior Outfit pattern on PixieFaire which will give you an instantly downloadable PDF pattern. Click on the link or picture to go there.


The set includes sewing and assembly instructions for
  • Tunic 
  • Pants 
  • Sash
  • Belt 
  • Tabards

Also see my free Galactic Warrior tutorials


Out of copyright and legal reasons I had to rename my posts and descriptions but I hope you still know what I am referring to :-)

Galactic Warrior - LightSaber for American Girl Doll

See my other free Galactic Warrior  tutorials

What you need

  • glow stick, bracelet size
  • silver or black duck tape
  • 2" x 2" piece of paper
  • 2" piece of tape (optional)
  • rubber band (optional, so that doll can hold the light saber)
  • hot glue gun and hot glue (optional)

How to make the Light Saber

1. Cut a piece of paper 2" x 2" and wrap around one end of the glow stick.
    Tape in place.
    This way the glow stick can be removed from the handle and replaced with a new one.
    Otherwise you can just omit the paper and go straight to the next step.

2. Cut a 2" piece from black or silver duck tape and wrap over paper to create handle.

3. Cut a 1/8" piece of duck tape (width of duck tape roll) and wrap over handle top

4. Decorate handle with black and silver duck tape (optional)

5. Pull glow stick out of handle and fill bottom of handle with hot glue (optional)

6. Re-insert glow stick after glue has cooled off and add rubber band (optional)


You are done !!!

See my other free Galactic Warrior tutorials


Out of copyright and legal reasons I had to rename my posts and descriptions but I hope you still know what I am referring to :-)

September 29, 2015

Archery - overview for American Girl Doll


Modern Archery items

Modern Recurve Bow for American Girl Doll

See my other free archery tutorials 

This bow is not meant to be used for real shooting, just for decorative purposes !!!

What you need

  • cardboard like a cereal box
  • glue (PVC glue like Elmer's glue)
  • super glue (optional) Adults ONLY !!!
  • polymer clay (Sculpey or FEMO or such)
  • black sewing thread (14 yrds)
  • 2 silver or gold seed beads (the tiny ones that are just about 2mm or so)
  • acrylic paint to paint the limbs (I used metallic silver spray paint from Rust-oleum)
  • sharp knife to cut polymer clay
  • Heavy books for weights
  • wooden craft sticks (tongue compressors at least 1/2" wide)


How to make a recurve bow

1. Creating the limbs.
    Take the cardboard and cut 8 strips 1/2" x 7"

2. Take 4 of the strips and glue them together as a stack but only glue the first 4 1/2"
    Leave the last 2 1/2" without glue.
    Let glue dry.
    Repeat for the other 4 strips


3. Take the glued cardboard strips and have some heavy books ready.
    Put glue between all layers on the last 2 1/2" then bend the ends up about 45°
    Leave the first 5" unbend and then start bending up at about 5".
    Let glue dry.
    Repeat for the other strip stack.

4. Cut the bend up section down to about 1" in length and round the ends.
    Cut slits for the string about 1/2" from the end.
    Paint.


5. Creating the riser.
    Take your polymer clay and take 1/4 of the package
    Form a 1/2" x 1/2" x 3" rectangular prism.
    I used wooden craft sticks (tongue depressors) to shape.


6. Find the center ( 1 1/2" from one end) and start forming the handle away from that center point.
    To form the handle just push down on all three sides tapering off towards the end.
    The whole handle indentation should be 1" long.
    Taper the last 1/2" downwards to the end using the fun stick to shape the slope.


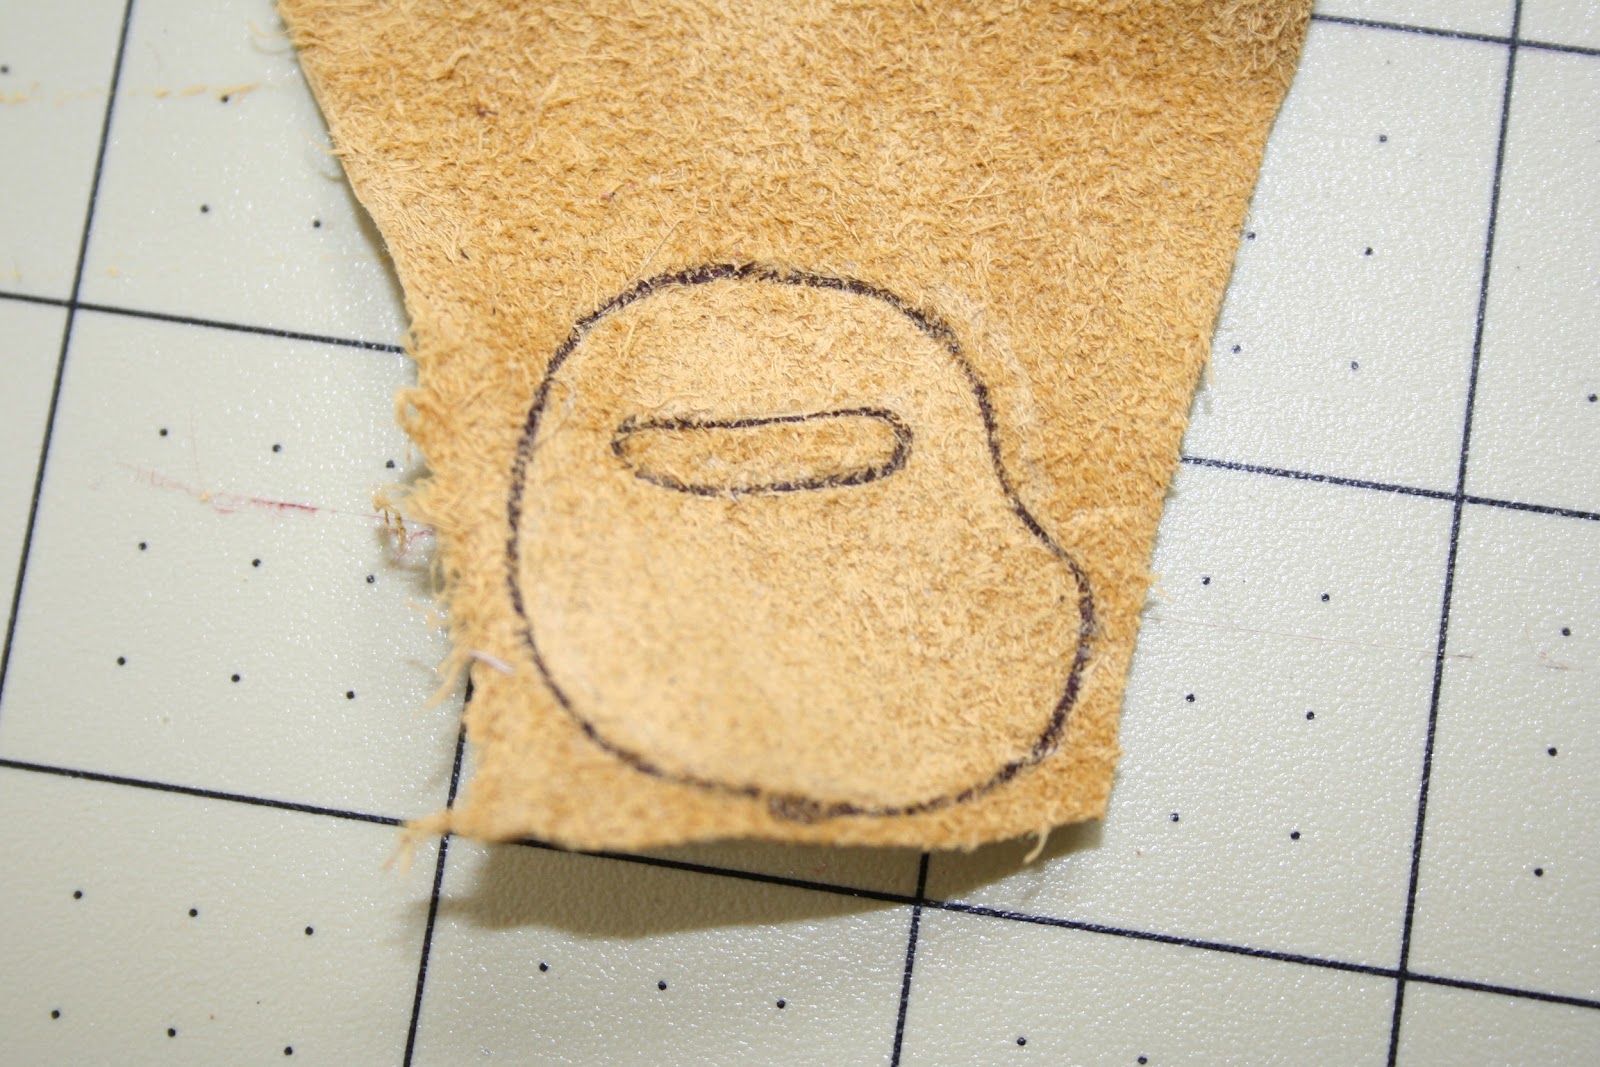
7.  About 1/8" on the other side of the center (about 1/8" away from the handle start)
    make a 1/8" vertical cut to start the arrow rest.
    Then slowly slope it towards the side. The whole arrow rest opening should be about 3/4".

8. Cut the overall piece to about 3" long and taper the last 1/2" downwards towards the end.
 

9. Turn the riser on its side, so the arrow rest opening faces up.
    Bend the riser on both ends (should be the same on both ends, here I bend the left side more
    than the right by accident)
    Make sure the first and last 1/2" stays straight, this is where we mount the limbs later.

10. Bake according to sculpey clay manufacturer directions.

11. Glue the limbs to the riser. Make sure you have the ends pointed the right way, see picture.
      I used super glue here but that should only be done by an adult !!!!

12. Make the bow string
      Take your black sewing thread and measure 40" then fold back and forth until you have 4 strands.
      That will give you 4 strands each being 40". Tie a knot on the side with the loose ends.
      The image shows the already finished rope.

13. Twist the thread until it starts curling (but keep in tight). It took me close to 5 minutes when
      I did it manually. The second time I did a bow string, I used my Dremel rotary tool on the slow
      setting, that took about 1 second :-)

14. Fold in half and let it curl on itself to create a rope

15. Create a 3/4" loop on one end.

16. Thread 2 seed beads onto the string

17. Measure between your slits for the bow string.
      Create another 3/4" loop on the other end.
      Make sure the overall length is your distance between the slits, mine was 12 1/2" long.
      The string's overall length is measured when the loops are closed, not open.
      When the loops are opened to go on the risers, that will shorten the string just enough to bend
      the limbs slightly.
      Put a dab of glue on both loop knots and cut leftover rope.

17. Put one loop onto the limb end into the slits, then carefully bend the limbs a little to put
      the other loop onto the other limb.

18. Finding the nock points
       Take your arrow (see tutorial here) or a stick and put on arrow rest and go to the bow string.
       The arrow and bow string should form a 90° angle.
       Align the seed beads on top and bottom of your arrow but don't make it too tight.
       Glue the beads in place.


Your bow is done !!!
See my other free archery tutorials 


Quiver for American Girl Doll


See my other free archery tutorials 

What you need

  • empty toilet paper roll
  • small piece of thicker card board (e.g. cookie box)
  • decoration (either)
    • leather looking vinyl or fabric that looks like leather or use real leather
    • acrylic paint and sealer and optional puff paint for 3D effects
  • glue (e.g. Elmer's glue)
  • hot glue or super glue (super glue for Adults ONLY !!!)
  • 3/8" wide ribbon if painting the quiver and not using vinyl/fabric/leather
  • 1/4" x 1" piece of velcro (either glue it on or use self stick velcro)


How to make the quiver

1. Cut a 1" diameter circle from card board

2. Take toilet paper roll and cut a vertical slit

3. Measure around card board circle and shorten to size (leave it a little larger, just in case)


4. Glue (super glue or hot glue) the to toilet paper roll around the circle.
    After you have glued most of it, cut the roll to size if it is too large.

5. Take a piece of paper and glue it over the toilet paper seam to hold the ends together.
 

6. If you are not covering the card board with vinyl or fabric, go to step 11.
    Else glue card board circle onto vinyl or fabric.
    After glue has dried, cut out circle.

7. Cut a rectangular fabric/vinyl piece, that fits around the toilet paper roll
    and is about 1/2" longer in height.
    Mine was about 3 1/4" x  4 1/2"

8. Glue covering onto toilet paper roll, align it at the bottom and go past the top by 1/2"
    (this picture shows 1/4", but it should be 1/2" for you)
    If you are using real leather or anything that is really thick, just cut to top of roll and skip
    the next step.

9. Fold excess towards the inside of the toilet paper roll and glue in place.

10. If you want, you can add strips of fabric/vinyl on top and bottom for decorations.
      Decorate with permanent markers, puff paint, rhinestones or whatever you can dream up.

11. If you are painting the quiver instead of using fabrics, paint, decorate and seal your quiver now.

12. Create the shoulder strap
       - if using vinyl or leather cut a strip 3/8" x 15"
       - if using fabric, cut a strip 7/8" x 15" and fold both sides 1/4" lengthwise and sew.
       - if using ribbon just cut a 15" piece

13. Glue the right side of the strap onto the back side of the quiver all the way from the top to
      about 1 1/2" from the bottom.

14. Add velcro to strap ends, straps will be overlapping 1".
      Rough velcro side onto bottom strap onto right side of the strap.
      Smooth velcro side onto top strap onto wrong side of strap.


Your quiver is done !!!
See my other free archery tutorials 

Archery Arm Guard for American Girl Doll

See my other free archery tutorials 

What you need


  • leather looking vinyl or real leather (5" x 2 1/2")
  • 1/8" ribbon about 13" long
  • 1/8" hole punch
  • 8x  1/8" eyelets and washers, optional


How to make the arm guard

1. Download archery template here.
    This is copyrighted by me, ReadCreations !!!
    For Home use only !

2. Cut arm guard from vinyl or leather

3. Punch 1/8" sized holes where indicated on pattern.
    To transfer hole location, stick a needle through the paper pattern into vinyl or leather piece.

4. Insert optional eyelets and washers.

5. Insert ribbon through holes.


Your arm guard is done !!!
See my other free archery tutorials 

Archery Finger Tab for American Girl Doll

See my other free archery tutorials 

What you need

  • leather looking vinyl or real leather (2" x 2")

How to make the finger tab

1. Download archery template here.
    This is copyrighted by me, ReadCreations !!!
    For Home use only !

2. Transfer template to wrong side of vinyl or leather

3. Cut out and try it out on doll's right hand.


You are done with the finger tab !!!
See my other free archery tutorials